Date Effective Processing

Overview
As part of the release on 21/08/2025 we have now added support within the system for date effective processing. For the time being, this is hidden as we are looking for beta customers.
This functionality allows users to add entries into the new date effective table certain pay fields, sickness entries and leave dates which will then be picked up when the relevant pay period is opened and processed accordingly.
For pay elements (such as salary) this will pro-rata the in-period values according to the settings on the pay element and pro-rata rules set on the pay group.
System Preparation
In order to use the date effective functionality, especially for pay fields, there are some things you may wish to check in the system. Firstly, on the modify fields page (In the desktop version - System>Maintain elements of pay>Maintain fields) there is a checkbox - Controlled by linked system.
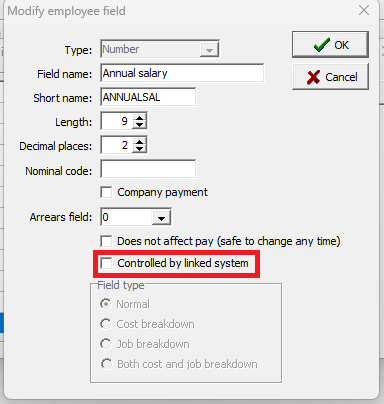
If this is unchecked, the system will use the value already entered on the employee record. When an entry is added into the date effective table and applied, it will use this until an end date is reached. At this point you may revert back to manually entering the value on the employee record.
If this is checked, the system will use the value already entered on the employee record. When an entry is added into the date effective table, the date effective table will become the source of truth going forward. If a field is end dated, going forward the value will be treated as 0.
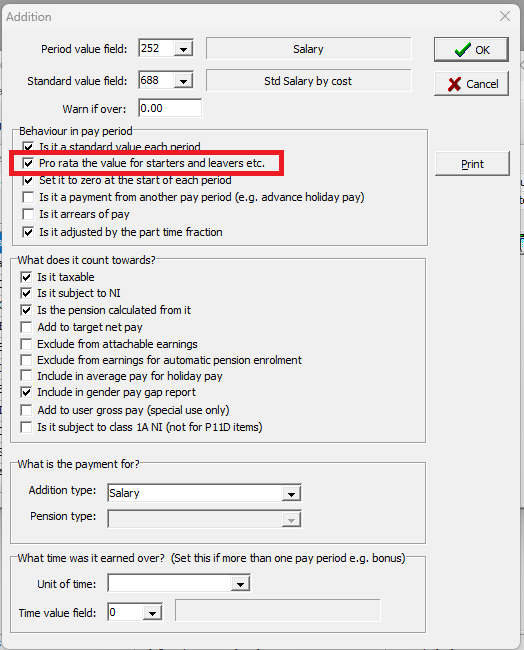
If you wish to use pro-rata for any of the fields, ensure the pro-rata settings are set up according to how you wish these to be calculated. You can turn these on for the field by accessing the field relationship in the desktop version (System>Maintain elements of pay>Maintain relationships) and checking the Pro rata the value for starters and leavers etc. checkbox.
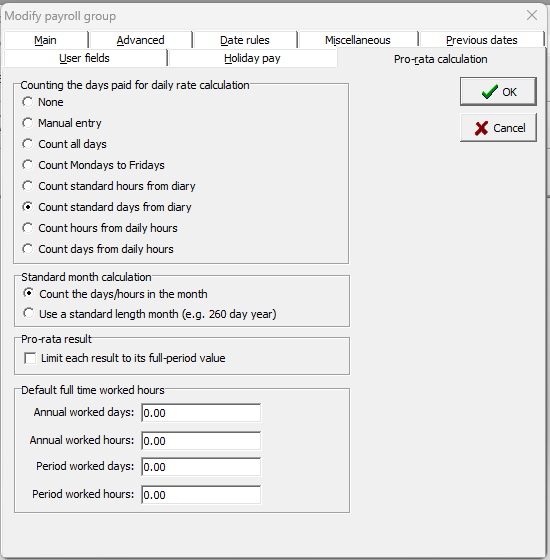
The calculation settings can be found in the desktop version in System>Maintain Pay groups on the Pro-rata calculation tab.
Date Effective Landing Page
We have added a new date effective landing page in both the employee record and the run payroll screen where all date effective data is stored.
In the manage employee screen, this can be found on the Date Effective tab.

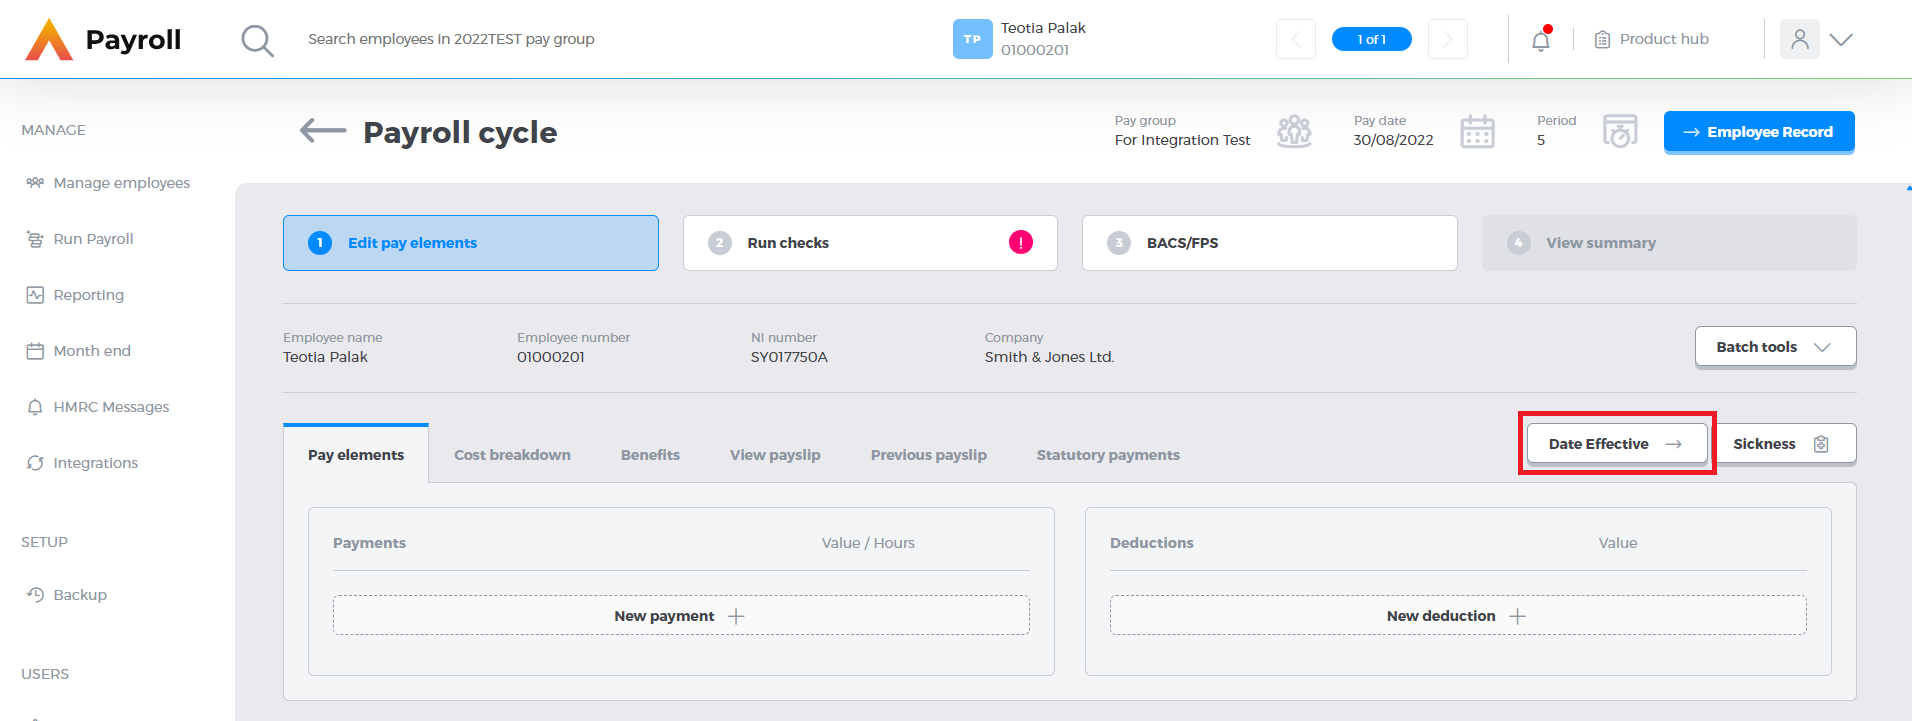
From within a payroll cycle it can be accessed using the Date Effective button.
The landing page defaults to showing the record type fields and has variety of different information, buttons and filters.
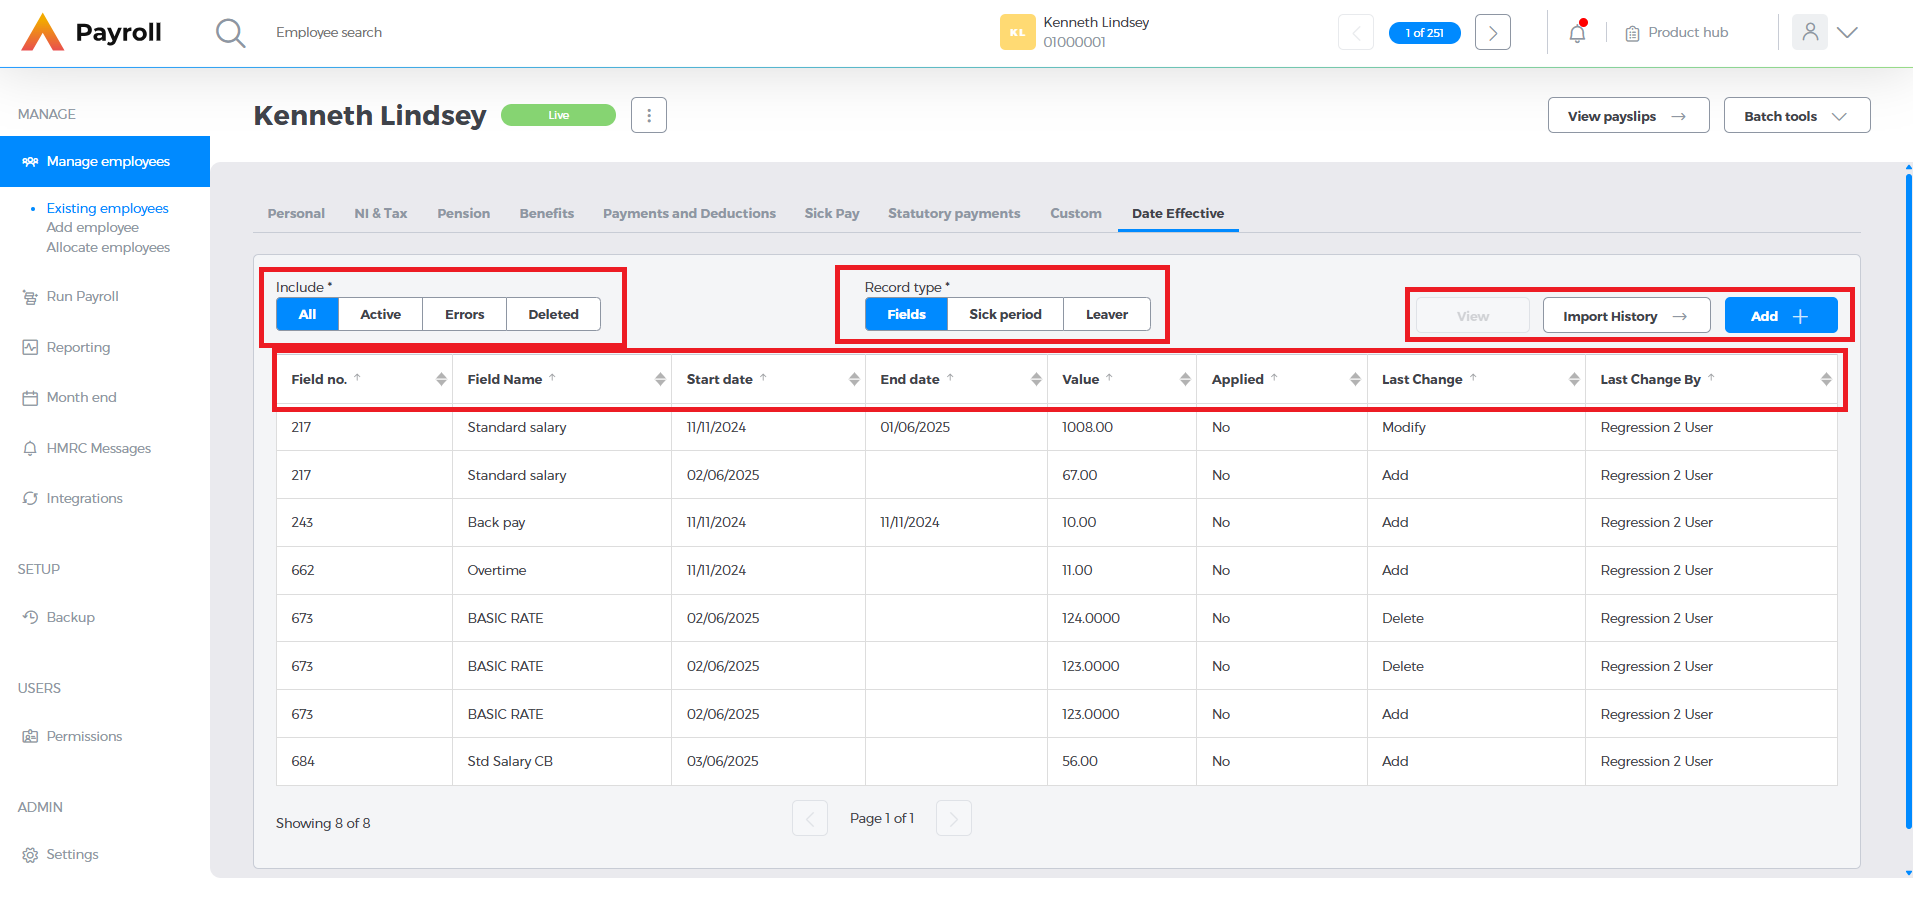
Status filters allow you to filter the display between showing All records, Active records (which are live records that don't have any errors or are marked as deleted), records with Errors, and records that have been Deleted (these are only marked as deleted, and are still visible in the table.

The Record type filter allows you to navigate between the three types of data that can be stored: Fields, Sick Period and Leaver information.

Each record type will display slightly different information on the screen including whether the record has been applied, what the last change type was and which user made the last change.
Fields will also show field number, field name, start date, end date and value.
Sick period will show start date, end date and whether the sick is in days or hours.
Leaver will show the leave date and the deceased flag.
The buttons on the right hand side allow you to Add a new record, view the import history and view a record when a line is selected.
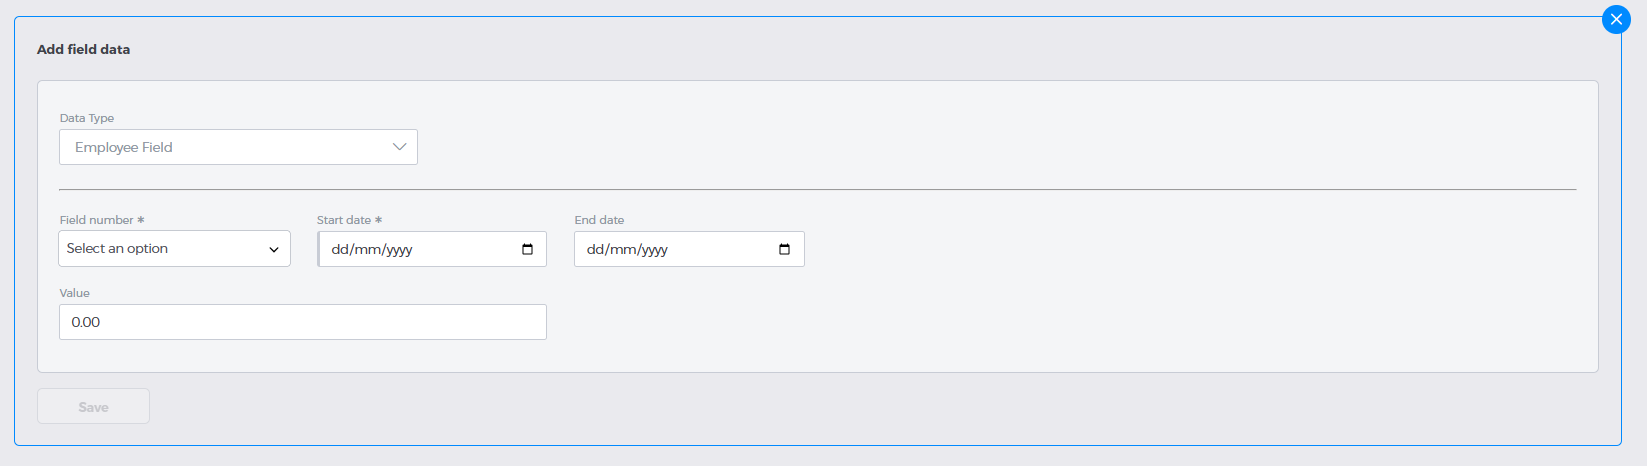
Adding a record
To manually add a record, censure the record type that you want to add is selected in the central filter then click the Add + button.

This will take you to the relevant data type entry form, where you can enter the required fields.
Fields
For fields you will need to select the field, add a start date, an end date (optional), and value.
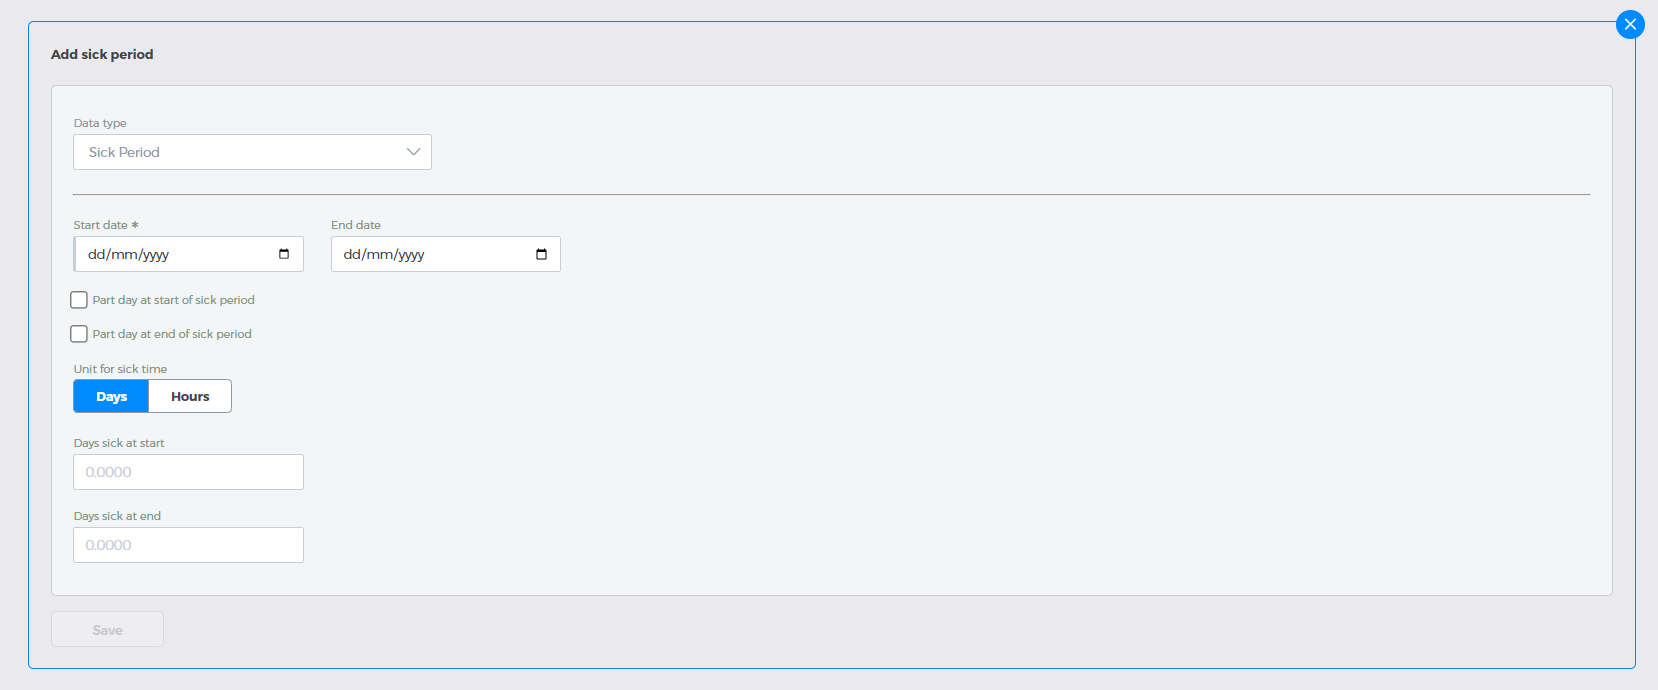
Sick Period
For sick period, the form is very similar to the ongoing sickness form. You will need to select a start date and end date (optional). There are two check boxes to indicate whether the start or end of the sick period is a part day. Checking either of these will allow the entry boxes at the bottom to be populated with the part day. You will also need to select the unit of time that applies to the sickness period.
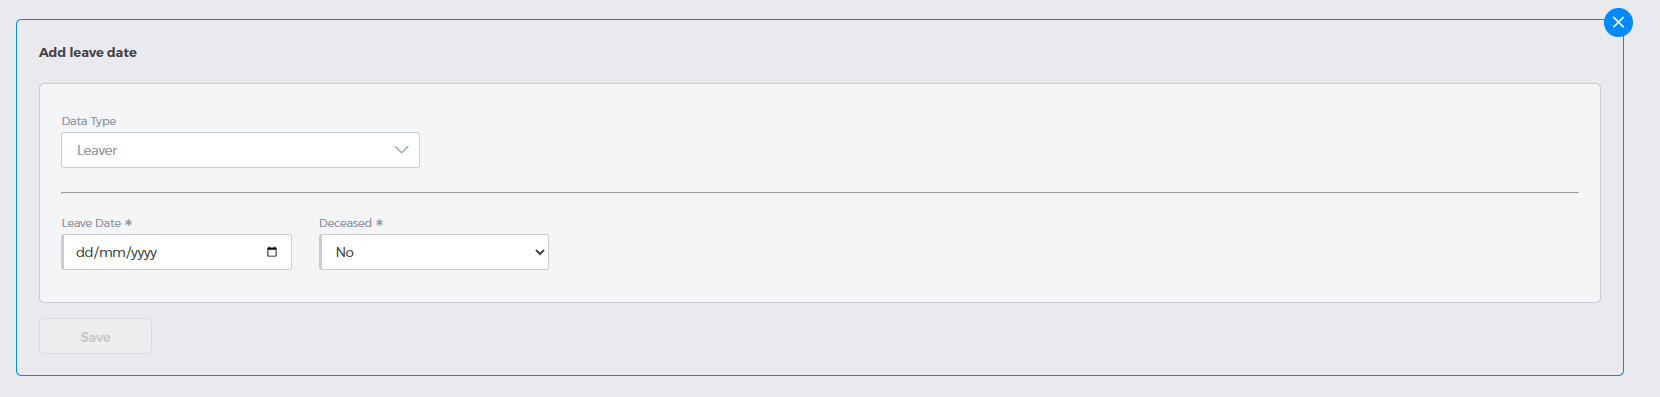
Leaver
For a leaver entry you need to enter the leave date, and set the deceased flag if necessary.
Once the relevant form is complete, clicking the save button will add the data to the table ready to be picked up when processing payroll.
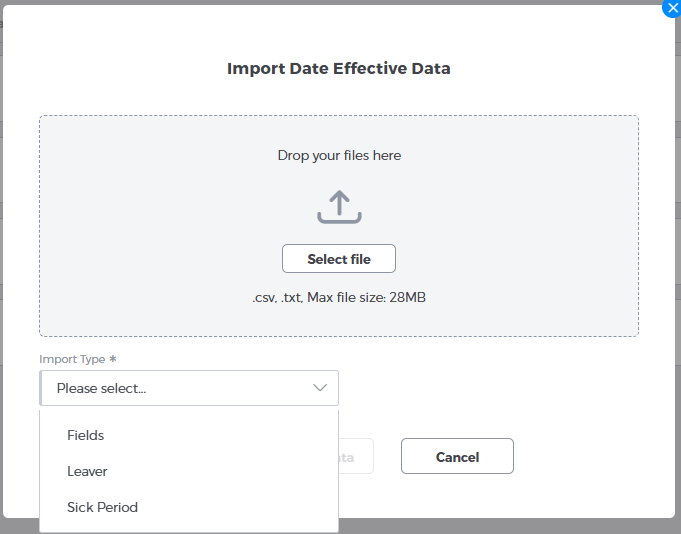
Importing Records
As well as single entry, you also have the option to import them in bulk. This can be done by selecting Batch tools and Import Date Effective Data.

From here you will need to select the import type, and select the relevant file that you need to need to import then click Import Date Effective Data
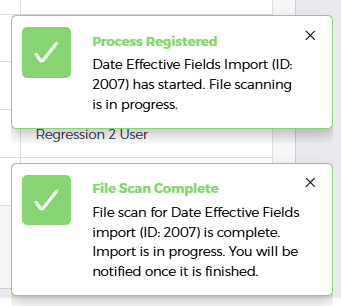
You will receive notifications when the file import begins and again when it is complete.
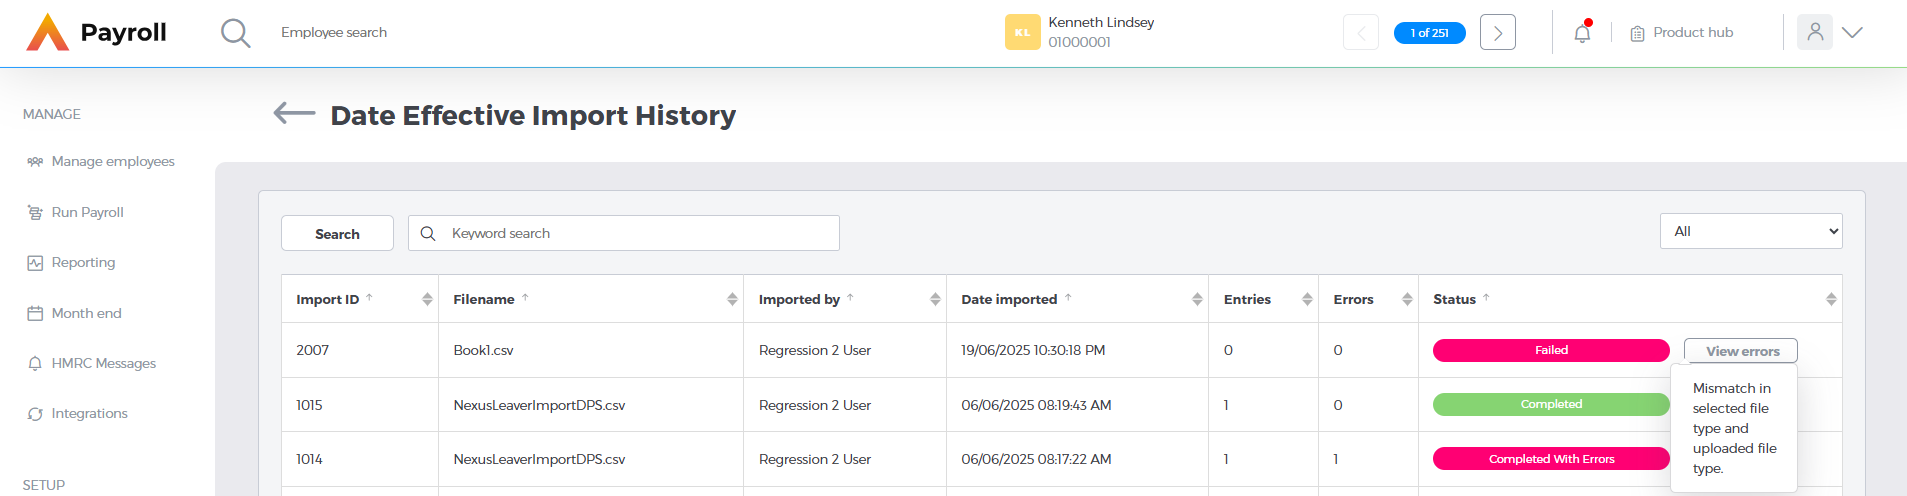
To view the history and status of all uploads select the Import history button from the Date effective tab.
From here you will be able to see the details of the import, as well as the status and any errors that were on the file.
File formats
The file format for fields is:
FIELDS,,,,
PAYNUM,FIELDID,STARTDATE,ENDDATE,VALUE
01000011,217,11/11/2024,11/11/2024,13
The file format for Sick period is:
SICKPERIOD,,,,,,,
PAYNUM,STARTDATE,ENDDATE,PDATSTART,PDATEND,SICKUNIT,TIMESICKATSTART,TIMESICKATEND
01000012,10/11/2024,11/11/2024,TRUE,TRUE,Days,0.6,0.9
The file format for Leaver is:
LEAVER,,
PAYNUM,LEAVEDATE,DECEASED
01000011,11/11/2024,Yes
Viewing, Editing and Deleting
To view an entry, simply select the entry to wish to view and click the view button.
This will take you to the view screen.
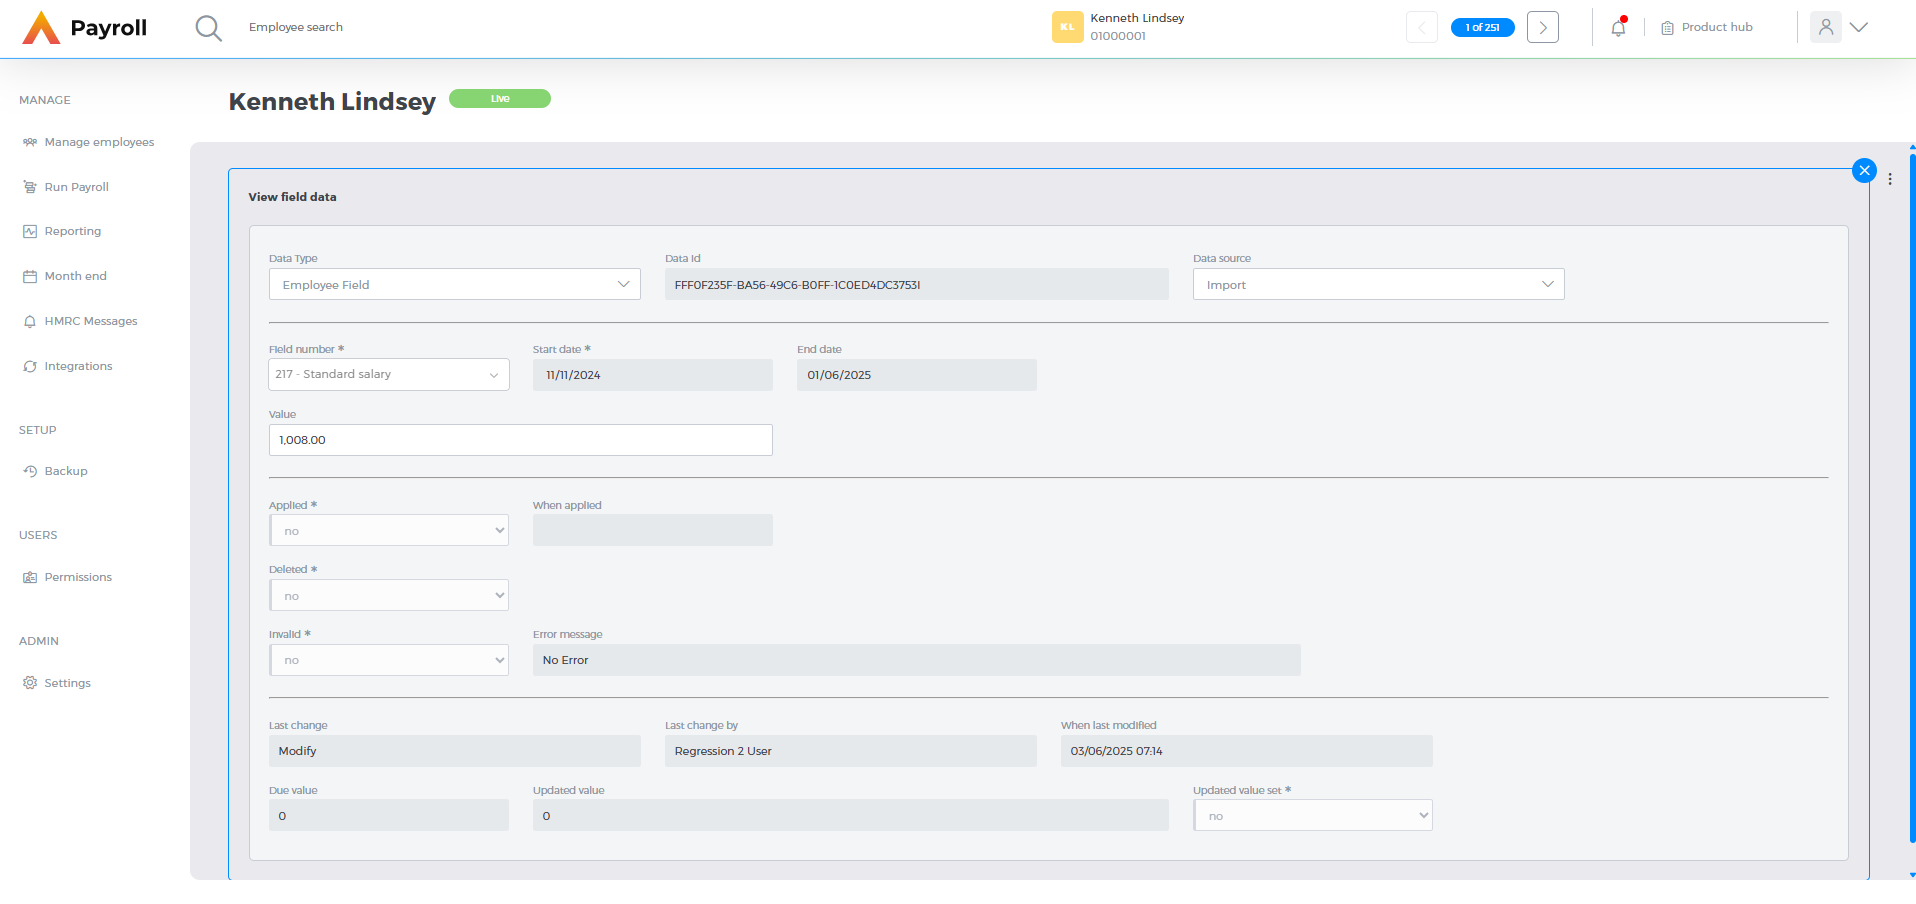
As well as the data that was input there are a variety of system fields that are present that are populated as the data is applied to a record including if any backpay is due (Due value) and if that has been processed (Updated value).
To edit the record click the 3 dots in the top right of the screen and select Edit.
To delete the record, click the 3 dots in the top right of the screen and click Delete. As mentioned above, this will mark the entry as deleted but it will still be visible in the table for auditing purposes.
Applying the data
Data from the date effective table will be automatically applied as part of the payroll calculation when opening a payroll. If any changes are made during the course of a payroll, you can either update these across the whole payroll, or on an individual basis. Currently, any date effective changes that are in the past can calculate back pay for the previous period only. Changes further back will need manually adding in.
To do this on an individual basis from within the run payroll screen click the up arrow next to the Recalculate button and click Set HR data. This will check the date effective table for the individual you are on and apply any changes if necessary.

You will then be presented with a modal. To apply click Yes.

To apply the data for everyone on the payroll select Batch tools>Set HR values
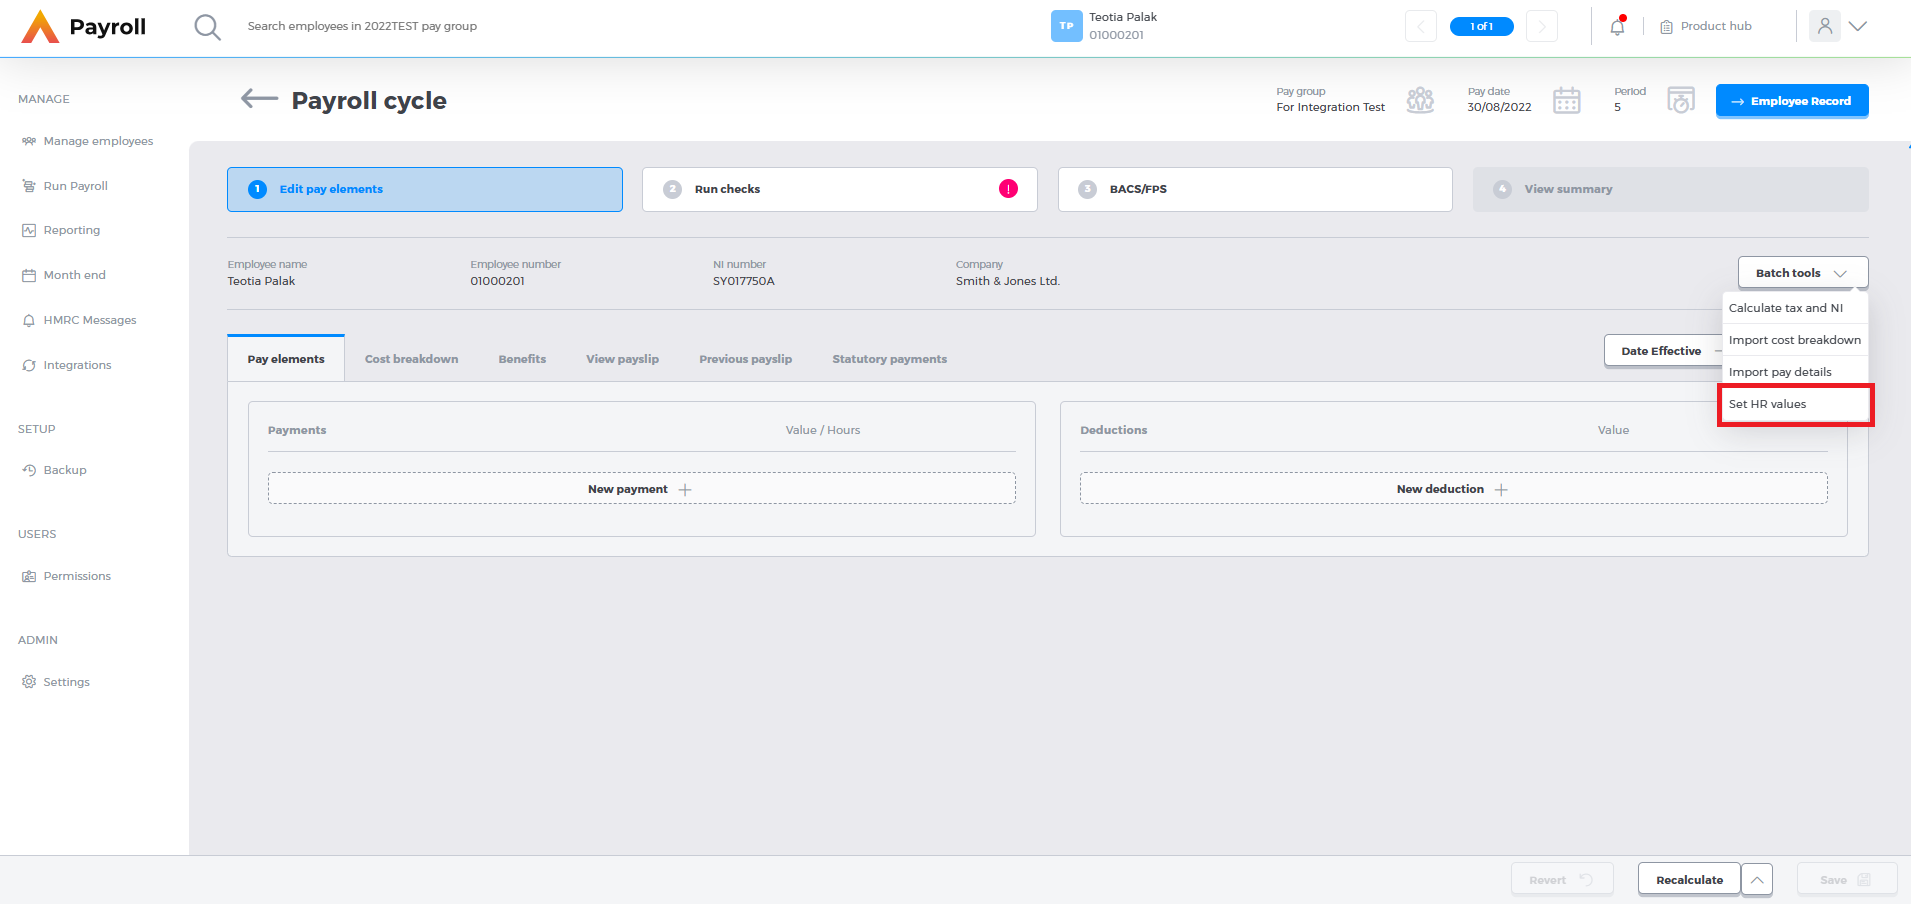
You will then be presented with a modal. To apply click Yes.