Payroll user guides
Payroll desktop
Functionality
Import Cost Centres and Departments
Copy Companies
Import Benefits
Adding a New Pay Element
Pay Rises
Modifying Custom Reports
Company and Employee Audit Trail
Maintaining Users and User Profiles
Automatic Pension Re-enrolment
Maintaining Elements and Relationships
Average Holiday Pay improvements
Change NI Table Letter
Loans and Save Schemes
Adding additional fields to payslips
Maintaining Display Views
Viewing RTI Submissions
Standard (STD) and Live Pay Period fields
Benefits - Car Allowance Optional Remuneration Arrangement (OpRA)
Average Holiday Pay
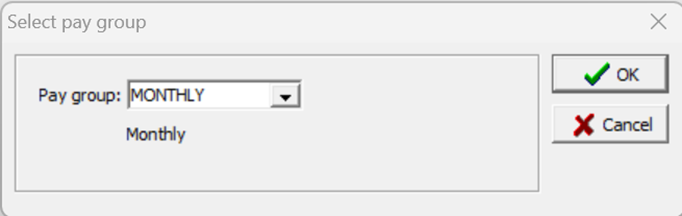
Changing Pay Groups
Statutory Neonatal Care Pay (SNCP) - desktop version
Statutory Parental Bereavement Pay for Northern Ireland (SPBPNI)
Statutory Sick Pay (SSP) Changes April 2026
Release v2.52
COVID-19 changes to SSP
Class 1A NI contributions
CEO Pay reporting
Termination awards
New rules for low-emission cars
Hours and Days in Payroll
Employment Allowance changes
Parental Bereavement Pay
History generation for Pensions and Pay groups
IR35 Working rules
Holiday pay calculation changes
Changes to Pension re-enrolment
Printer names on RDP
Plain Paper P45s
Release v2.56
2.56 Release Report
Payroll version 2.56 Upgrade Instructions
Health and Social Care Levy message on the payslip
Support for the Alabaster ruling
Automatic recalculation of SMP,SPP etc
New NI Letters for freeports and veterans
HMRC gateway password saving
Release v2.58
Release v.2.61
Rolled up holiday pay for irregular hours and part-year workers
Statutory Paternity Pay (SPP) legislative update
Company Sick Pay (CSP)
Diary Changes for CSP
Working Patterns
Elements of Pay
Errors and Troubleshooting
Payroll web
Manage Employees
Creating an Employee
Editing an Employee’s details
Viewing an employee’s payslips
Making an Employee a Leaver
Printing Employee P45s
Emailing Employee P45s
Change Employee NI Letter
Running Payroll
Starting a Payroll Cycle
Edit Pay Elements
Benefits
Cost Breakdown
Run Checks
Emailing Payslips (as part of running a payroll)
BACS/RTI
View Summary and close payroll
Restart Payroll cycle
Adding and Removing Employees from Payroll
Date Effective Processing
Statutory Payments
Statutory Payments
Statutory Maternity Pay (SMP)
Statutory Sick Pay
Import Sickness
Company Sick Pay (CSP) web functionality
Statutory Paternity Pay (SPP)
Import of Sick Pay information
Statutory Parental Bereavement Pay (SPBP) and Statutory Parental Bereavement Pay for Northern Ireland (SPBPNI)
Statutory Neonatal Care Pay (SNCP)
HMRC Messages
Month End
Permissions
General System Use
Reporting
Emailing in the web application
Importing Data
Backing up Data in Payroll
Support is Evolving
Product Hub
Release notes
11/06/2026 - Desktop v.2.64.3 release
05/05/2026 - Desktop v.2.64.2 hotfix
09/03/2026 - Desktop v.2.64.1 hotfix
05/03/2026 - Web v. 2026.1.0 & desktop v. 2.64.0 - Year-end release
20/01/2026 - Web v.2025.3, Desktop Version 2.63.3 hotfix
15/01/2026 - Web v.2025.3, Desktop Version 2.63.2
10/10/2025 - Web v.2025.2.3 hotfix
11/09/2025 - desktop v.2.63.1.1 hotfix
09/09/2025 - web v.2025.2.2 hotfix
08/09/2025 - Web v.2025.2.1 hotfix
29/08/2025 - Desktop v.2.63.1 hotfix
21/08/2025 - Web v.2025.2.0 and desktop v.2.63.0 release
06/03/2025 - Web v. 2025.1.0 & desktop v. 2.62.4 - Year-end release
12/12/2024 - Web v.5.8.1 release
14/11/2024 - Web v.5.8 release
03/10/2024 - Web v.5.7 release
04/07/2024 - Web v.5.6 and desktop v.2.61.4 release
16/04/2024 - Payroll - desktop v2.61.3.1 hotfix
27/03/2024- desktop v.2.61.3 - Year-end release
28/02/2024 - Web v.5.4 and desktop v2.61.1 Year-end release
11/12/2023 - desktop v.2.58.2 release
28/02/2023 - desktop v.2.58 - Year-end release
25/01/2023 - Web v.5.3 release
30/05/2022 - desktop v.2.56.2 release
24/10/2022 - desktop v.2.56.3 release
31/05/2022 - Web v.5.2 release
Year End Activities
- All Categories
- Year End Activities
- Year-end Update Guide 2026
Year-end Update Guide 2026

Pre requisites to running a year end
- System upgraded to the latest Version 2.64 (For hosted customers, the upgrade is performed by Advanced). If you host payroll on your own internal servers, this will need to be performed by you. (Upgrading your system). For on-premise customers, the upgrade link for v.2.64.0 can be found here. This will be available after 5pm on 05/03/2026.
- All final pay cycles of the tax year updated, and final FPS or EPS completed with “This is the last submission of the tax year” ticked when processing. You only need to ensure this is ticked on one of the EPS or FPS and not both. (Last submission of the year)
Instruction Steps
- Copy year-end folder
- Run year-end check report
- Print P60s
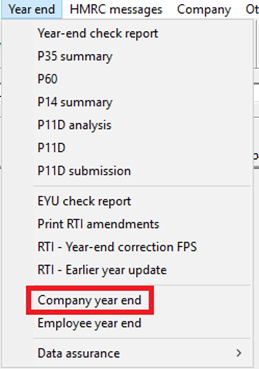
- Company year-end
- Employee year-end
All steps are to be actioned within the Live data folder and not the year-end copy.
Copy Year-end data instructions
To Copy the data file select File in the top left of the Payroll application, then select Copy year 2025/26 data.
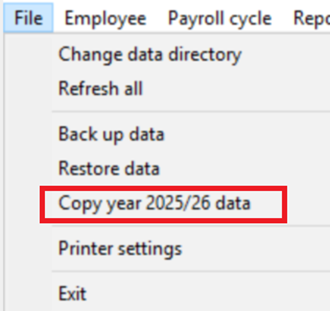
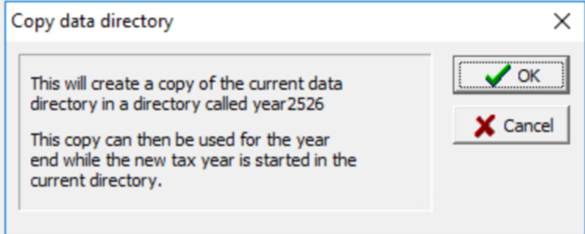
Once that option is selected, a message box will appear asking you to confirm. Click OK to continue. Payroll will then create a folder called year2526 winpay folder.
This process should be repeated for each of your live data folders. To do this, you will need to change the live data directory.
To change data directory go to file – change data directory.
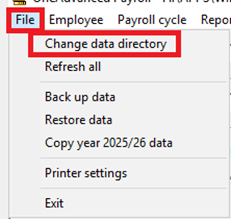
Select the 3 dots to the right of the screen – click on the data directory you intend to go into and click ok

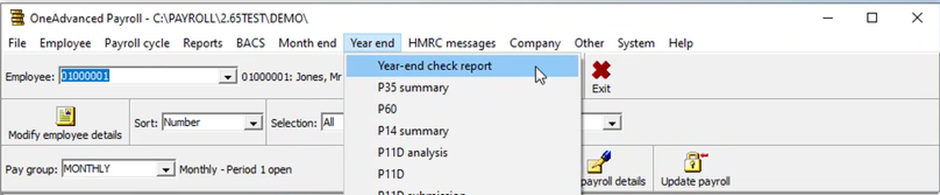
Run Year-end check report
You must run the Year-end check report from the Year-end menu in Payroll.
Make sure there are no errors and that you review any warnings that appear. It is imperative that you correct any of the errors found.
If you have been running the month-end check regularly throughout the year, then this should minimise the amount of errors that need to be corrected.
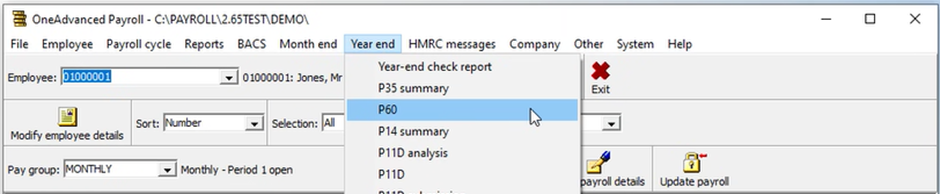
Print P60s
To generate a P60, select P60 from the Year-end menu in the Payroll toolbar:
Ensure 2025 is entered in the “These P60s are for tax year starting” field.
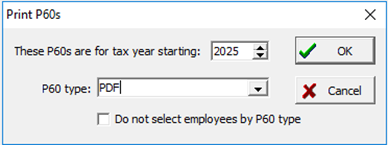
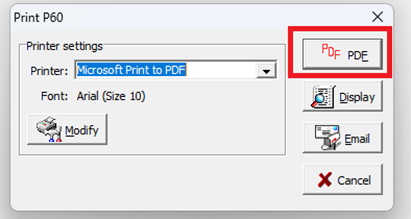
For a PDF copy of the P60 click on PDF
Company year-end
Select the Year-end menu on the Payroll toolbar and then select Company year-end from the dropdown menu.
This will open the following form:
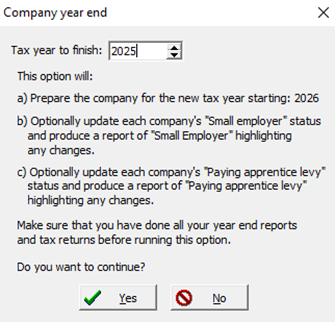
Ensure that the correct tax year (2025) is selected in the box at the top. Click Yes to proceed, which will open the following screen:
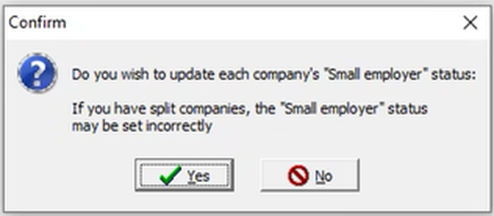
This gives you the option of updating your small employer status. Click Yes to allow Payroll to determine each company’s Small employer status, or No to omit this process.
This will be repeated for the Paying apprentice levy option. Again, choose Yes or No depending on your choice.
After you pick Yes or No, a form will be displayed. This allows the user to choose to print, display, email or create a PDF of the company year-end report:
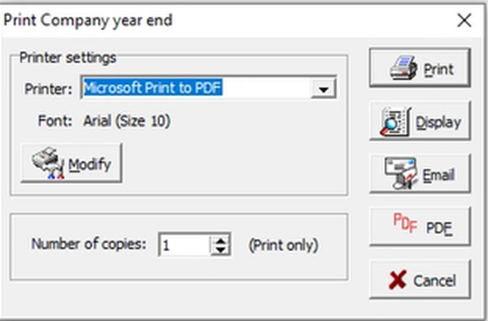
Selecting cancel will abort the whole process and you will need to repeat the company year-end procedure from the start.
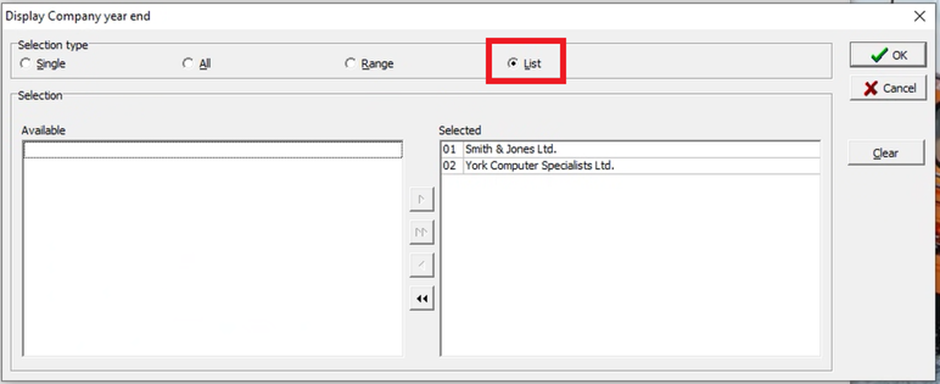
The next screen allows the user to select which companies to be processed. Choose list view to display the companies, or simply click all if you want all companies to be processed.
Split Companies
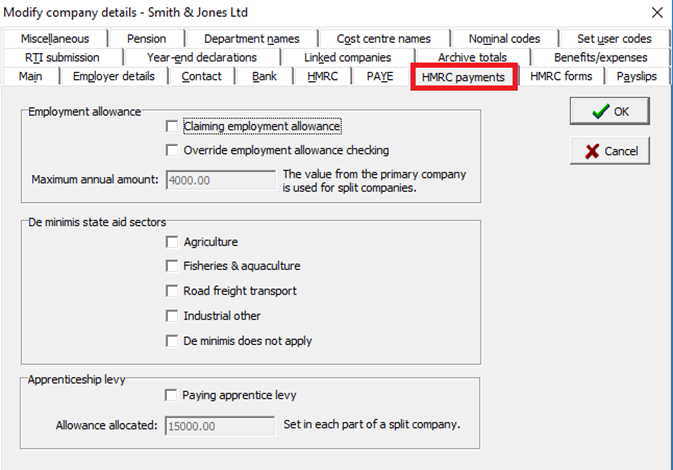
If you have any split companies, you will need to check each company individually. To do this, go to Company across the top menu bar and then maintain details.
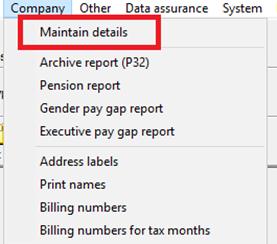
Next, select a split company and click modify. Proceed to the HMRC Payments tab and ensure the employment allowance fields are correct.
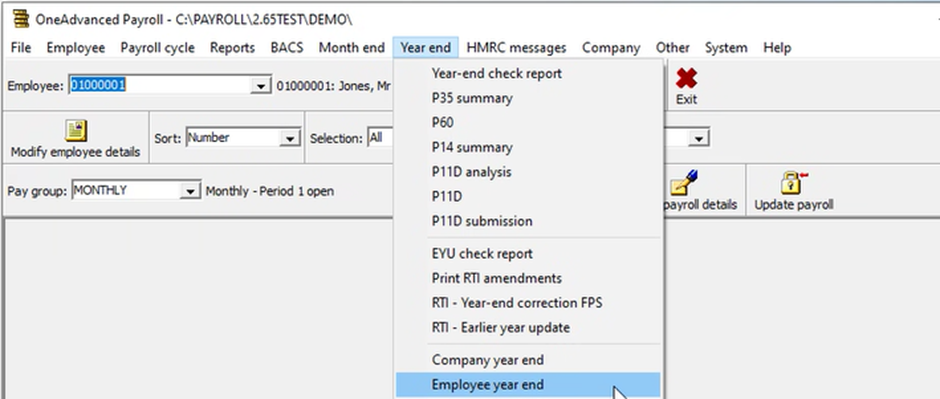
Employee Year-end
Tax code uplifts are done automatically during the employee year-end procedure.
Click on Year-end in the payroll toolbar and choose employee year-end from the drop-down menu.
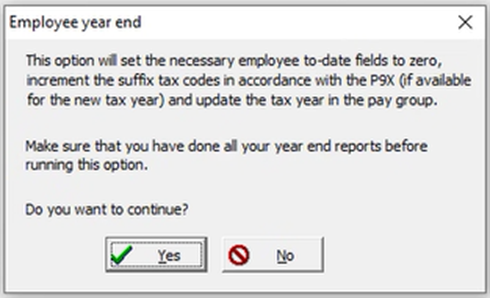
This will open a new window which will ask you to confirm that you want to carry on with the Employee year-end process. Click Yes to continue.
You will need to perform this step for each pay group within the system.
You have successfully completed year-end.